
A honed bore isn’t just “round” — the surface itself has to hold a controlled pattern of peaks and valleys that let the rings bed in, retain a thin oil film, and seal against combustion pressure without excess blow-by or oil consumption. Too rough, and the rings never seat. Too smooth (a “glazed” bore), and there’s nowhere for oil to sit — rings glide instead of sealing.
Step 1 — Setup
- Torque plate on, every time. A block distorts slightly under head-bolt tension; honing without the plate produces a bore that’s round on the bench and out-of-round the moment the head goes back on.
- Deck surface and bore clean and dry before starting. Zero your dial bore gauge against a certified standard before the first pass, and re-check it periodically through the job.
- Target roundness tolerance through the whole process: within ±0.0002″ (±0.005mm), checked at multiple points top-to-bottom and around the full 360° of the bore — not just at one height.
Step 2 — Honing sequence by ring face material
Organized by what the rings are actually faced with — the correct number depends on the ring, not the brand:
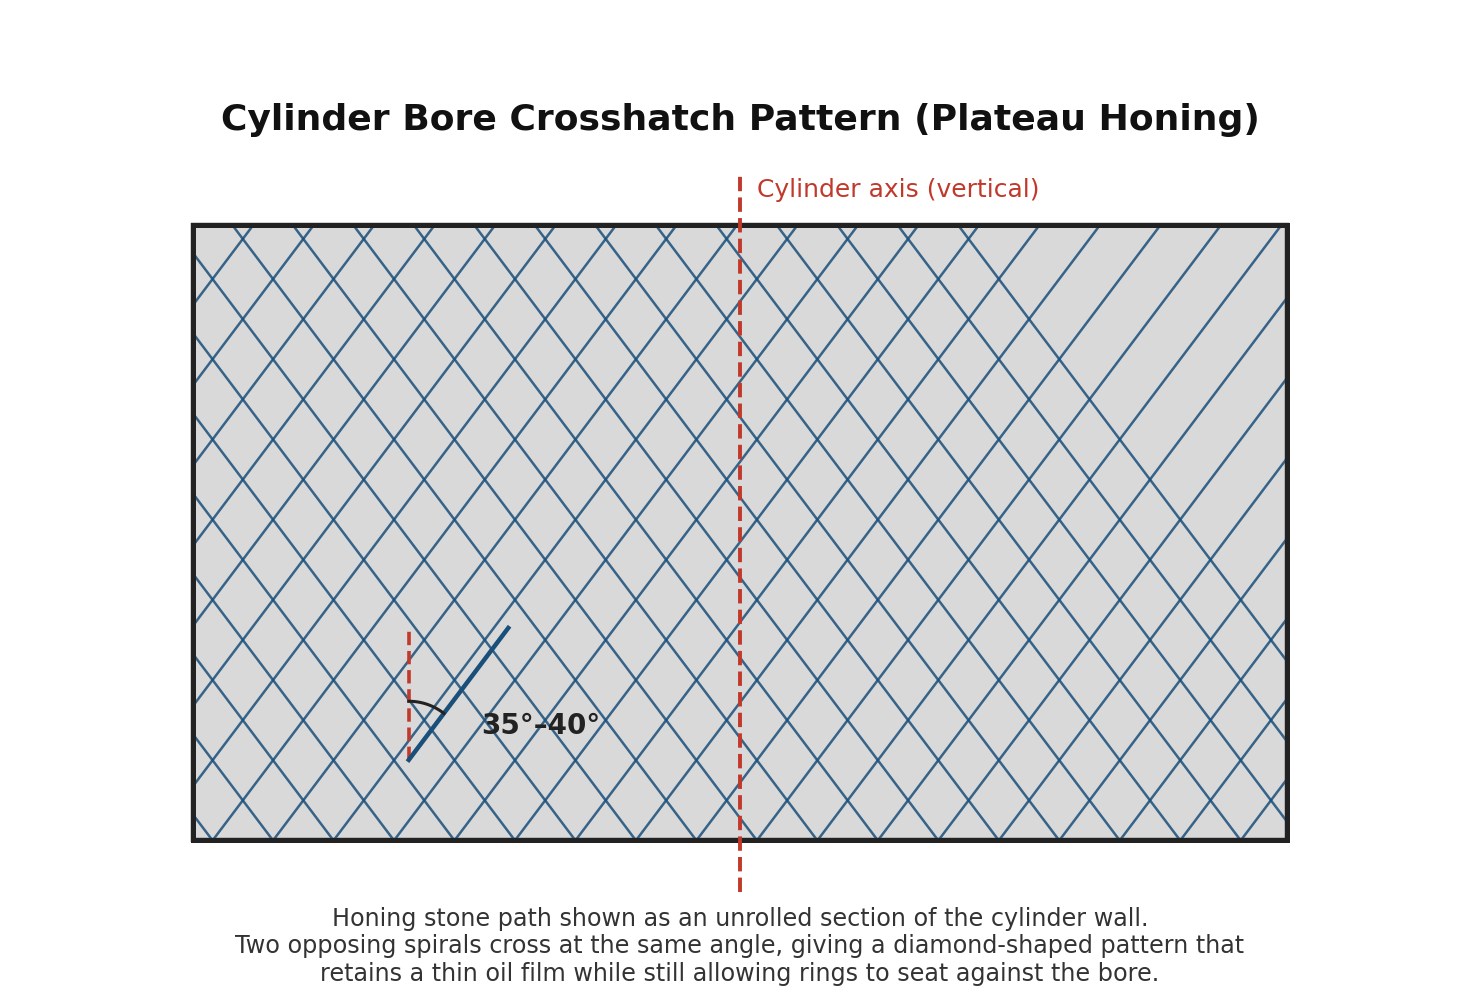
Every ring type below is honed with the same basic diamond-shaped crosshatch pattern shown above — what changes between ring types is the grit sequence and the target surface finish, not the pattern itself.
Gas Nitrided rings (carbon steel, nitride-treated face)
- First stone: #220 grit, hone until 0.001″ remains before final bore size.
- Check roundness to 0.0002″ all the way around the bore (360°).
- Second stone: #280 grit at 50% load, until 0.0002″ remains before final size.
- Final pass: same #280 grit stone at 20% load, to bring the bore to final size.
- Torque plate stays on for the entire sequence above.
- Crosshatch angle: 35°–40°. Target surface finish: Ra 15–35 µin (0.4–0.9 µm), Rz 59–138 µin (1.5–3.5 µm). Applies to gray cast iron blocks and Nikasil-lined cylinders.
Moly-faced rings
- Intermediate stage: #220 grit, held within 0.0005″ of final size.
- Final hone: #400 grit.
- Crosshatch angle: 20°–22° — noticeably tighter than nitrided.
- Target surface finish: 10–12 Ra.
Chrome-faced rings
- First stone: #220 grit, hone until 0.001″ remains before final bore size.
- Check roundness to 0.0002″ all the way around the bore (360°).
- Final pass at 20% load, maintaining 0.0002″ tolerance before final sizing.
- Crosshatch angle: 35°–40° — same as Nitrided.
- Target surface finish: Ra 28–35, using #220 grit only — no finer finishing stone needed. Chrome and cast-iron-faced rings are the one category that wants a rougher finish, not smoother — the harder, non-porous chrome face needs that extra roughness to seat and hold oil.
PVD-coated rings (e.g. titanium nitride / steel-based coated facings)
- Finish with a fine plateau hone — coated rings need the most demanding finish of any type here, so work through to a fine finishing stone and plateau step the same as Nitrided, never the coarse chrome approach.
- Crosshatch angle: 35°–40°.
- Target surface finish — not a simple Ra number: PVD-coated rings have no natural porosity, so the bore finish alone has to do 100% of the oil retention job. Recommended targets: Rpk 10–15 µin, Rk 40–45 µin, Rvk 50–55 µin. If your equipment only measures Ra, use the Nitrided target (Ra 15–35 µin) as the closest fallback.
Step 3 — Finish / plateau pass (all ring types)
- Primary honing stones: conventional abrasive #220–#280 grit, or diamond stones #325–#550 grit for the equivalent stage.
- Finish stone: matches the ring-specific final grit above — #220 only for Chrome (no finer stone needed), #280 for Nitrided, #400 for Moly and PVD-coated.
- Follow with a plateau step — a flexible hone, brush, or nylon-bristle plateau honing tool run through the bore briefly — to knock down the sharp peaks left by the finish stone without removing the underlying crosshatch. This is what actually protects new rings from a rough “break-in scuff” on first start.
Step 4 — Cleaning (the step most shops rush)
- Honing grit embeds in the pores of the cylinder wall — a solvent wipe alone does not remove it.
- Scrub every bore with hot, soapy water and a stiff brush (bore brush, not a rag), rinse, dry immediately, then run a clean white cloth through the bore — if it comes out grey/black, keep scrubbing.
- Coat the fresh bore with light oil right after drying to prevent flash rust before assembly.
Step 5 — Final check before assembly
- Re-verify bore diameter and roundness with the dial bore gauge one last time, with the torque plate still on, before pulling the plate for final cleaning.
- Set ring gaps per the Piston Ring Gaps guide — bore size and material feed directly into that formula, so this step only makes sense once the honing above is finished and the bore is at final size.